
Bottom-Aligned Gallery Wall with IKEA Frames
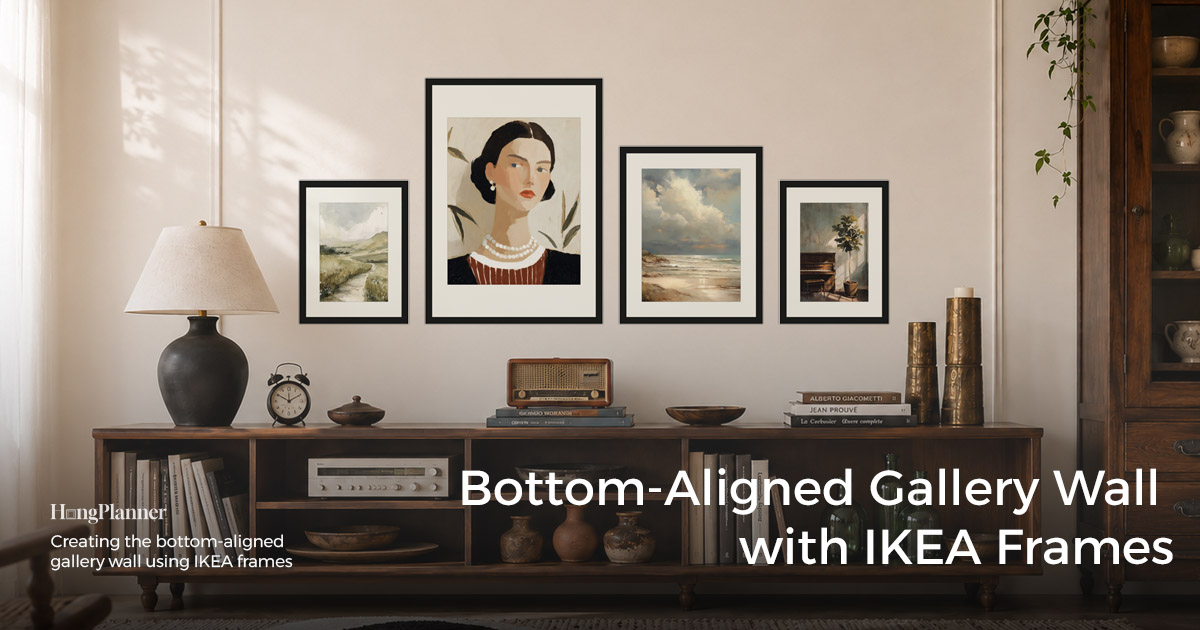
A bottom-aligned gallery wall has just one rule: every frame lines up along the same horizontal line at the bottom, and the tops float free at whatever height they land. A strict grid lines up all four edges; bottom-aligned only cares about the bottom one — which is exactly what makes it the easiest layout to start with.
It also gives you a freedom no other layout does: you can happily mix frame sizes. Because heights don’t have to match, 21 × 30 cm, 30 × 40 cm and 40 × 50 cm can sit in one row and — as long as the bottoms line up — read as considered, not messy.
Here’s where it belongs in one line: anywhere with a horizontal edge above it — a bookshelf, a mantel, above a sofa, a console table, a headboard. That horizontal line is your ready-made baseline, so the wall looks like it grows out of the furniture instead of floating in mid-air.
This piece sorts out three things: how to arrange bottom-aligned, which ready-made layout to pick, and why it’s the best place for a beginner to start.
The lazy default
Above a bookshelf / mantel / sofa / console table → line up the bottom edge along the top of the furniture, 3 to 6 frames in mixed sizes. Frames: one series in one colour is easiest, but you can absolutely mix across series and colours (HangPlanner lets you combine any frames and preview first). Rhythm: let a big frame anchor a high point, the rest weaving high and low — don’t let it climb steadily from one end to the other like a staircase.
Height: we usually suggest the group’s visual centre at 57 inches (150 cm), but it’s more accurate to base it on the average height of the people who live there — the most comfortable spot is with the centre of the arrangement at eye level. When it sits above furniture, leave about 15–25 cm (6–10 in) between the bottom of the group and the top of the furniture.
One alignment note: when you mix sizes, each frame’s hook sits a different distance above its bottom edge, so a hook nailed even slightly off throws the bottom line out — let HangPlanner work out how high each hook goes instead of eyeballing it.
Pick the count by wall width: 3, 4 or 6 frames
The number of frames follows your wall width, not “how many I feel like.” The method is simple — measure the wall first, then set the count and the anchor size. All three follow the same idea: a big frame anchors a high point, the rest weave high and low, and every bottom lines up.
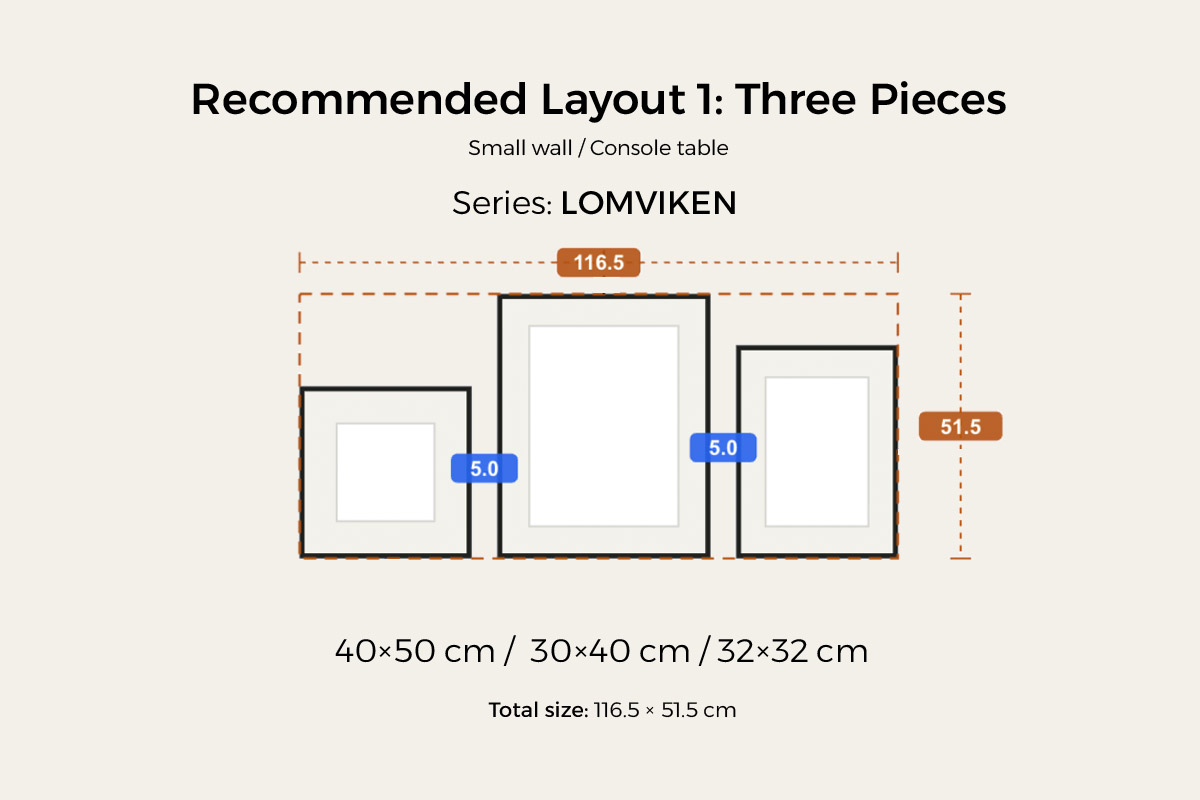
3 frames (group ≈ 115 cm / 45 in wide) — the smallest option, for a small wall, a console table, or the end of a hallway. One big frame (40 × 50 cm / 16 × 20 in) as the anchor, a smaller frame on each side.
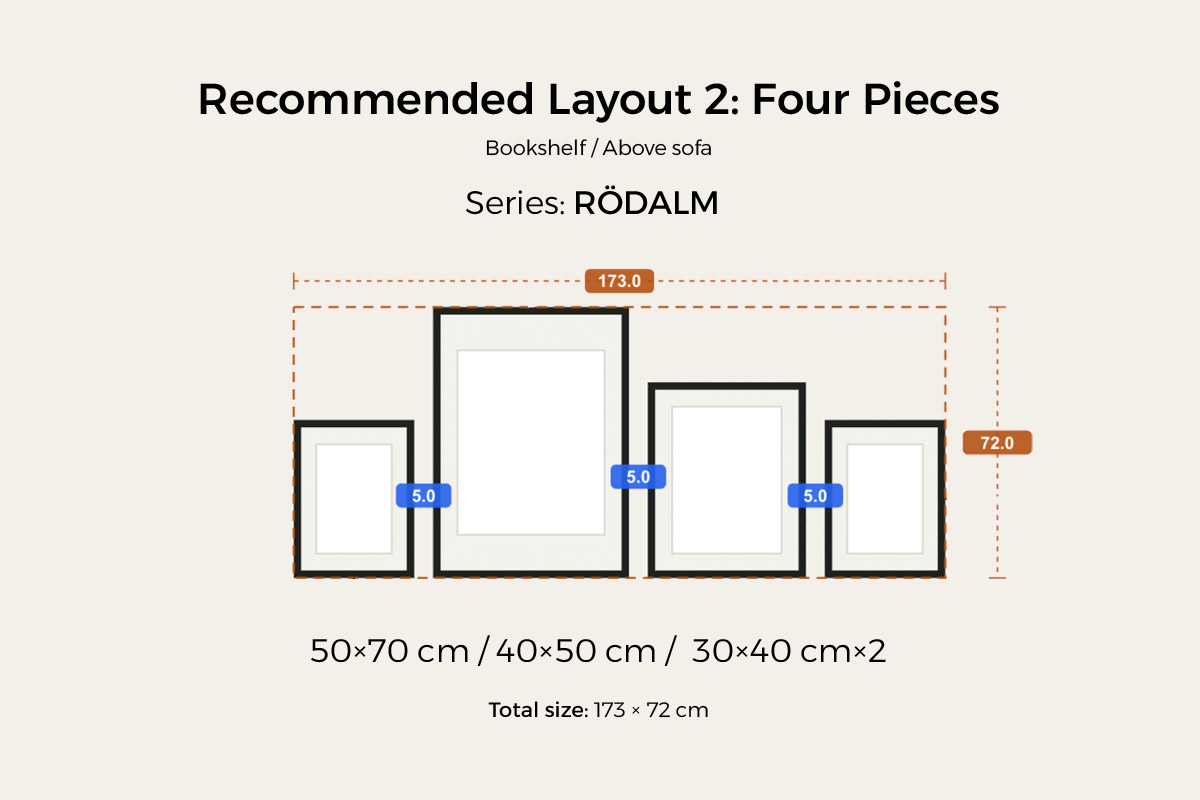
4 frames (group ≈ 140–235 cm / 55–92 in wide) — the most versatile, for above a sofa, bookshelf or long console. Use a 40 × 50 cm anchor on a narrower wall; the wider the wall, the bigger the anchor — step up to 50 × 70 or even 61 × 91 cm (24 × 36 in).
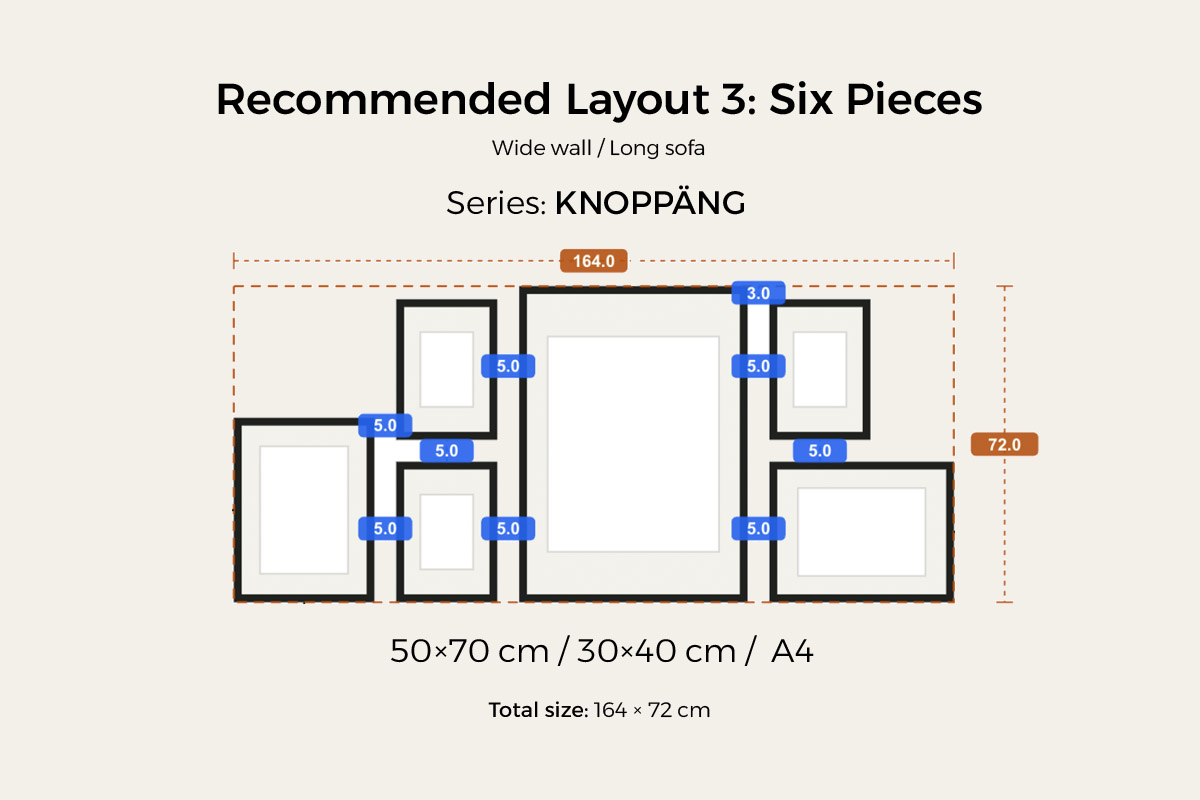
6 frames (group ≈ 165–215 cm / 65–85 in wide) — the spread-out option, for a wide wall, a statement wall, or a long sofa. Two or three big frames make two or three high points, with medium and small frames weaving between them.
A handy ratio: keep the group’s width at about 2/3 to 3/4 of the furniture below it — more natural than matching the furniture exactly. Whether it actually sits right is fastest to check by dragging a version in HangPlanner.
Why start with bottom-aligned
First, it needs only one baseline. No agonising over “mount or no mount” or whether every frame lines up — as long as that bottom line is level, the whole group holds together. One line is far easier to control than a whole grid.
Second, mixing sizes is its home turf. Got a few prints, photos or certificates in different sizes? A grid forces you to crop them all to one size; bottom-aligned welcomes the mix — big frames carry visual weight, small ones fill the gaps. A single IKEA series (RÖDALM, say) already runs 21 × 30 cm (~8 × 12 in), 30 × 40 cm (~12 × 16 in) and 40 × 50 cm (~16 × 20 in), all in one colour, so they mix naturally.
Third, it’s built to grow off furniture. The top edge of a bookshelf, mantel or console is a ready-made horizontal line. Align the wall’s bottom to it and the group reads as an extension of the furniture, not another thing stuck on the wall — a grounded look most other layouts struggle to get.
If what you want is a bit of variety, a relaxed feel, and still not messy — bottom-aligned is for you. If you want dead-even and every frame identical, a grid gallery wall → is what you’re after.
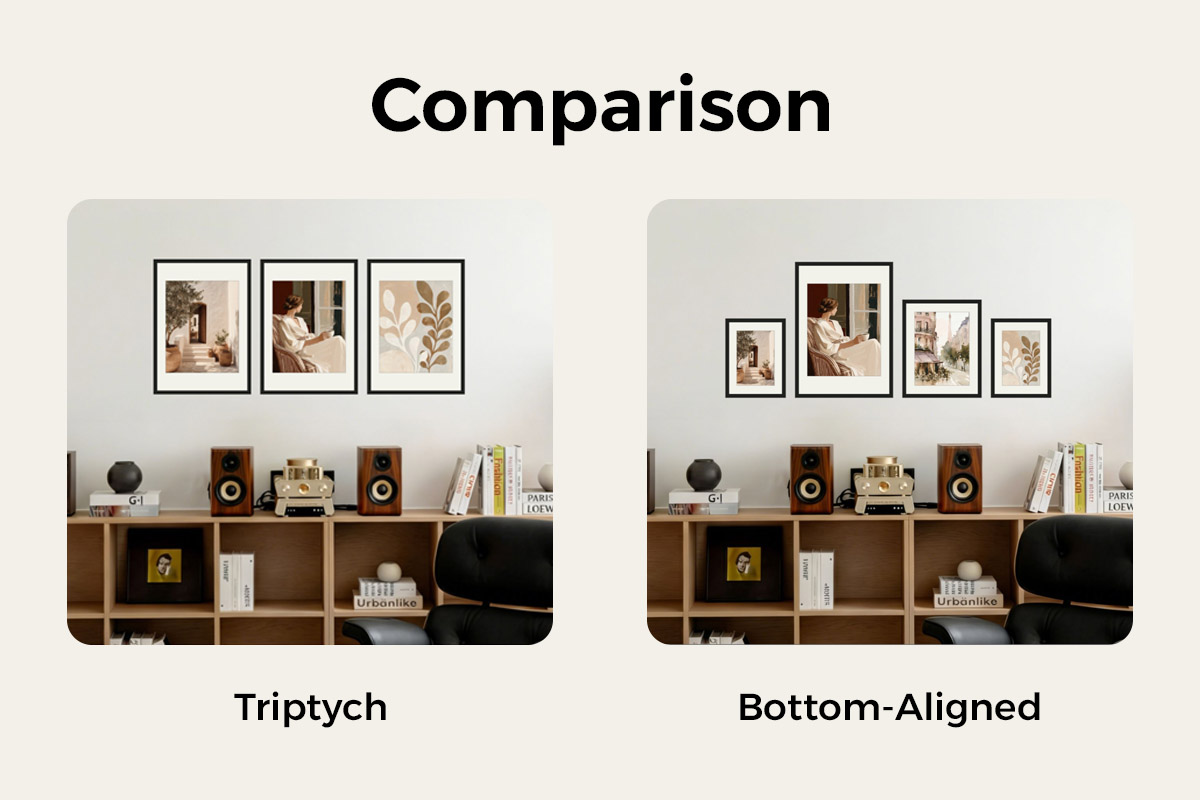
Three steps to a bottom-aligned gallery wall
Step 1: Set the baseline
Decide where the bottom line falls. On a wall with furniture — a bookshelf, mantel, sofa or console — use the top of the furniture as the baseline, leaving about 15–25 cm between the group’s bottom and the furniture. On an empty wall — treat the group as one big rectangle and put its visual centre at eye level (57 inches / 150 cm by default, nudged to the household’s average height), then work back to the bottom line.
Once it’s set, mark that line on the wall with a laser level. This line is the one thing on the whole wall worth being fussy about — it has to be level.
Step 2: Build the rhythm
Once the bottoms line up, the rise and fall of the tops makes or breaks the group. The trick is to let a big frame rise to a peak and the rest weave high and low, rather than climbing steadily:
- ✅ A big frame as the anchor: lift the largest frame or two to the highest point, and let the medium and small frames weave up and down around them — the eye gets movement and a focal point. A centred anchor is more symmetrical (good above a mantel); off to one side is more relaxed (good above a bookshelf or long console) — both work.
- ❌ A steady climb into a slope: lining frames up shortest-to-tallest, staircase-style, looks like an accident rather than a choice.
Not sure where the anchor goes or how the rest weave? Dragging two versions in HangPlanner to compare is the fastest way to decide.
Step 3: Choose the frames
The easiest route — pick one of the ready-made layouts in HangPlanner and hit Insert, and the sizes, series and colours are all set for you. Prefer to build your own? You have plenty of freedom: one series in one colour is the simplest, but you can also mix — HangPlanner lets you combine frames across any series and size. A mix looks just as good; drop it on the wall to preview, and if it looks right to you, go for it.
The walls bottom-aligned suits best
Above a low bookshelf. The top of the shelf is the most natural baseline. A row of bottom-aligned frames stepping up off the shelf ties the books and the art into one — one of the most durable looks for a study or living room.
Above a mantel. A mantel is already a strong horizontal line. Bottom-aligned lets the wall grow up off the shelf, a tall frame in the middle as the focal point and lower frames to the sides, echoing the symmetry of the fireplace.
Above a sofa. One of the most common spots in a living room. The top of the sofa back is an invisible horizontal reference; bottom-aligned lets the group step up off the sofa with more life than a row of equal-height frames. Keep the group’s width at about 2/3 to 3/4 of the sofa, with the bottom a comfortable distance above the sofa back.
Above a headboard. The top of the headboard is the baseline. Two things to watch here: one is safety — frames directly above the bed need to hang securely (use proper wall fixings or adhesive hooks, not a single hook); the other is a calming palette — bedrooms suit lower-saturation, coherent colours, nothing too loud.
A few ways bottom-aligned goes wrong
Tops that climb steadily. The most common mistake: lining frames up shortest-to-tallest so the whole group becomes a slope. Fix — lift one big frame to a peak and let the rest weave high and low on either side, so the eye gets some rise and fall.
A bottom line that isn’t actually level. The one hard rule of bottom-aligned is that single bottom line; if it tilts, the whole group collapses. Fix — always strike that line with a laser level before you hang, never by eye.
Hook heights not worked out when mixing sizes. This is the most overlooked and most decisive detail: each frame’s hook sits a different distance above its bottom edge, so once you mix sizes, how high each nail goes has to be figured out one by one — a hook even slightly off, and that frame’s bottom leaves the line. So bottom-aligned looks casual but is fussier about positioning than it seems. Fix — let HangPlanner work out the hook height for each frame from its size.
Mixing purely in your head, then buying without a preview. Mixing across series, colours and materials is entirely doable and often striking — but what you picture and what lands on the wall are two different things. Fix — don’t buy on a hunch; drop the mix on the wall in HangPlanner first, and keep it if it looks right or swap if it doesn’t.
Try it on your real wall in HangPlanner first
Bottom-aligned is forgiving, but three things are hard to picture in your head — the rhythm, how far the bottom line sits from the furniture, and how high each hook goes when you mix sizes. Dragging a version is the fastest way through. You don’t have to calculate the sizes, the gaps or the hook heights — HangPlanner uses the real Frame width to give you the group’s overall size, every gap, and the position of each nail. That last part matters for bottom-aligned in particular: mix the sizes and the hook heights are all different, and working them out by hand is exactly where a frame ends up nailed off the line.
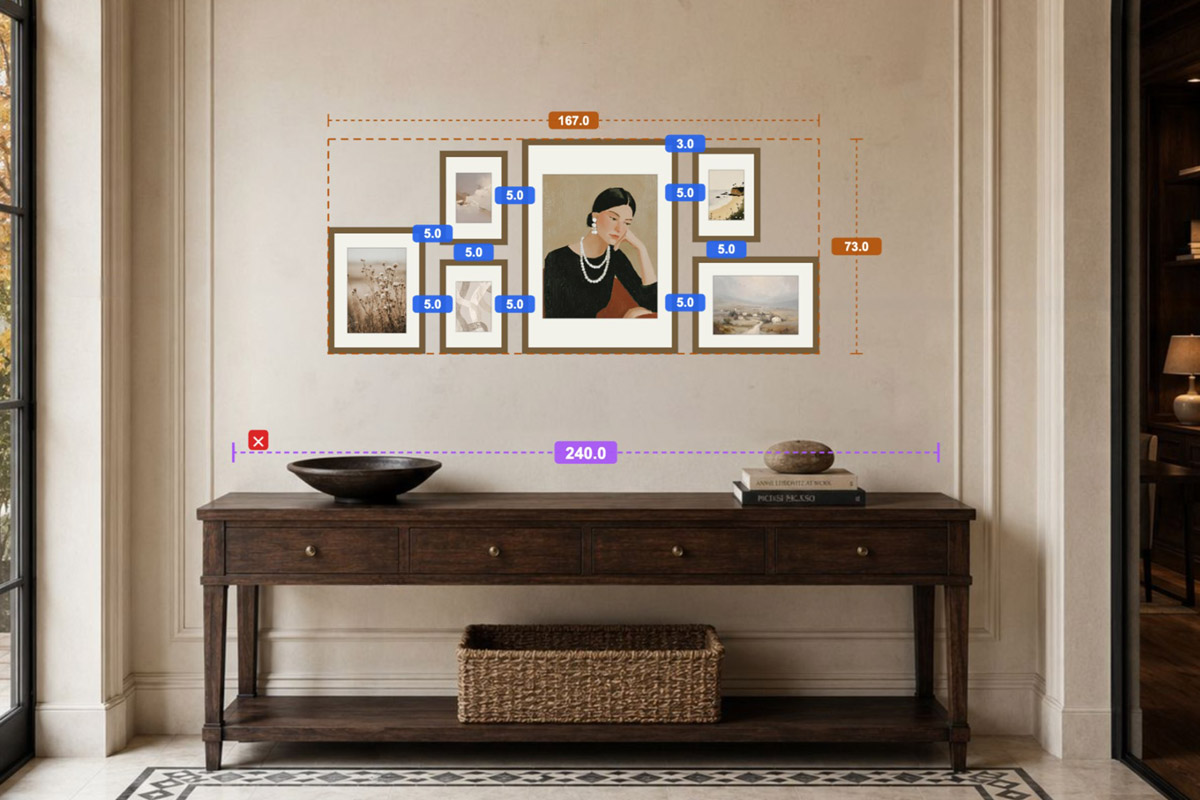
In HangPlanner, set your wall size, or upload a photo of the real wall and calibrate the scale against something of known size — a bookshelf, mantel or sofa — then:
- Place the furniture below first — a bookshelf, mantel, sofa or console table
- Drop in a ready-made set, or drag in a few frames in different sizes (3 to 6)
- Align their bottom edges to the line along the top of the furniture
- Adjust the tops — let a big frame rise to a peak and the rest weave — and try a few rhythms
- Switch to Dimensions for the group’s width and height, every gap, and the distance to the wall edges — all worked out
- Mark each frame’s hook position on the wall, so even mixed sizes hang to one bottom line
- Open Wall Budget to compare the cost of different combinations
You can see on screen which version sits best — a lot cheaper than drilling the wrong holes and then filling and repainting.
FAQ
What is a bottom-aligned gallery wall?
Where does a bottom-aligned gallery wall work best?
Can a bottom-aligned gallery wall mix different frame sizes?
How should the tops of a bottom-aligned gallery wall be arranged?
Is the "30 × 40 cm" in an IKEA product name the outer frame size?
How high should a bottom-aligned gallery wall hang, and how far above the furniture?
When you mix frame sizes, how do you keep the bottoms actually on one line?
How many frames should a bottom-aligned gallery wall have?
Sizing facts follow IKEA’s official Measurements fields — Frame width / height, Frame depth, Mount opening, Picture with mount, Picture without mount — where the name-size is the Picture without mount, not the outer frame. Frame series shown are current IKEA lines; confirm size, colour and availability on your local IKEA product page before buying. All sizes are given in cm and inches.