
Focal Gallery Wall with IKEA Frames
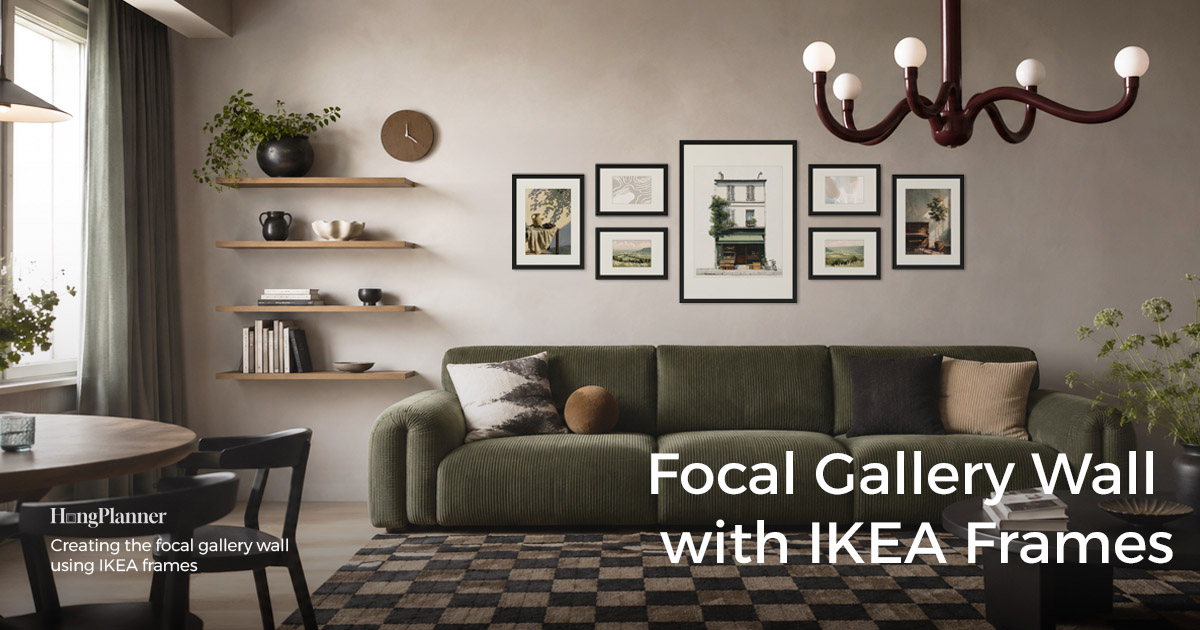
A focal gallery wall has one star: the big frame in the middle. It anchors the centre, the smaller frames sit symmetrically around it, and the whole wall reads like a single piece — the big frame carries the content and the attitude, the small ones echo its palette or theme rather than each speaking on its own. That’s the big difference from a strict grid: in a grid every frame is equal; a focal wall has a clear lead and supporting cast.
The thing that’s easiest to miss — and matters most — isn’t the size, it’s the alignment: the wall needs a vertical centre-line, and the anchor sits on it. When there’s furniture below, that line is the midpoint of the sofa, bed or fireplace, not the geometric centre of the wall; on an empty wall, you put the anchor at the centre of the wall or the main sightline. A focal wall is sensitive to that centre-line — a touch off and the whole group looks “crooked.”
Here’s where it belongs in one line: any wall where you want to give the room a clear focal point. Spots with a piece of furniture below are the most typical — above a sofa, above a headboard, above a mantel, above a console table — but a whole empty wall, the end of a hallway, or a stairwell turn work just as well.
This piece sorts out three things: how to choose the anchor, how to line the wall up, and how to arrange the frames around it.
The lazy default
One big frame anchoring the centre + smaller frames around it, symmetrically. Seven frames (anchor + three each side) suit above a sofa or long console; nine frames (anchor + a ring around it) suit a big statement wall. Anchor size: about twice the surrounding frames — an anchor of 50 × 70 cm (20 × 28 in) or 61 × 91 cm (24 × 36 in), with 30 × 40 cm (12 × 16 in) and 21 × 30 cm (A4) around it. Frames: one series in one colour is easiest, but you can also mix across series, colours and materials (HangPlanner lets you combine any frames and preview first).
Height: measure from the anchor’s centre, not the group’s — put the anchor’s visual centre at eye level, 57 inches (150 cm) by default, nudged to the average height of the people who live there. The small frames follow the anchor. Alignment note: the wall’s vertical centre-line runs through the anchor — over the midpoint of the furniture when there is furniture, over the centre of the wall or sightline when there isn’t. It’s the most important step of a focal wall, and setting the centre-line and the wall together in HangPlanner beats eyeballing it.
What a focal gallery wall is, and where it belongs
The logic is simple: set a visual centre of gravity first (that big frame), then let every other frame serve it. The big frame grabs the eye and gives the room a “look here”; the small frames build volume and breathing room around it. The weight sits in the middle, so it looks steady, has a clear hierarchy, and is the most “single artwork” of all the layouts.
Its most common home is a wall with a horizontal piece of furniture below — one big frame anchoring the centre, smaller frames laid out symmetrically to each side:
It’s clearly different from the two layouts it’s often compared with:
- Versus a strict grid — a grid wants every frame identical and all four edges aligned; that’s “order.” A focal wall deliberately lets one frame stand out; that’s “hierarchy.” Want dead-even, pick a grid; want one clear focal point, pick focal.
- Versus a symmetrical layout — symmetry is a left-right mirror and can have no central piece; a focal wall always has one anchor in the middle. The two can combine: one central anchor plus symmetrical small frames is the classic above-the-sofa look.
A focal wall asks very little of the wall — if you want to give it a clear centre, it works. A piece of furniture below as a “base” is the most common case, but it isn’t required; a whole empty wall suits it just as well, you just set that centre-line yourself.
With furniture to work off, it’s easiest:
Above a sofa. The most common spot in a living room, and a focal wall’s home turf. One big frame over the middle of the sofa as the focal point, smaller frames laid out symmetrically to the sides, and the wall instantly has a centre.
Above a headboard. A bedroom’s visual centre is already on the bed’s centre-line, and a focal wall echoes it. Two things to watch: safety — frames directly above the bed need to hang securely (use proper wall fixings or adhesive hooks, not a single hook); and a calming palette — lower-saturation, coherent colours that are easy on the eye at bedtime.
Above a mantel. A fireplace is already the room’s symmetrical focal point; one big frame in the centre with lower frames to the sides picks up its symmetry.
Above a console or long cabinet. The first thing you see coming in — a central focal point looks more “arranged” than a scatter of small frames.
An empty wall is just as striking, with the anchor as the wall’s own centre:
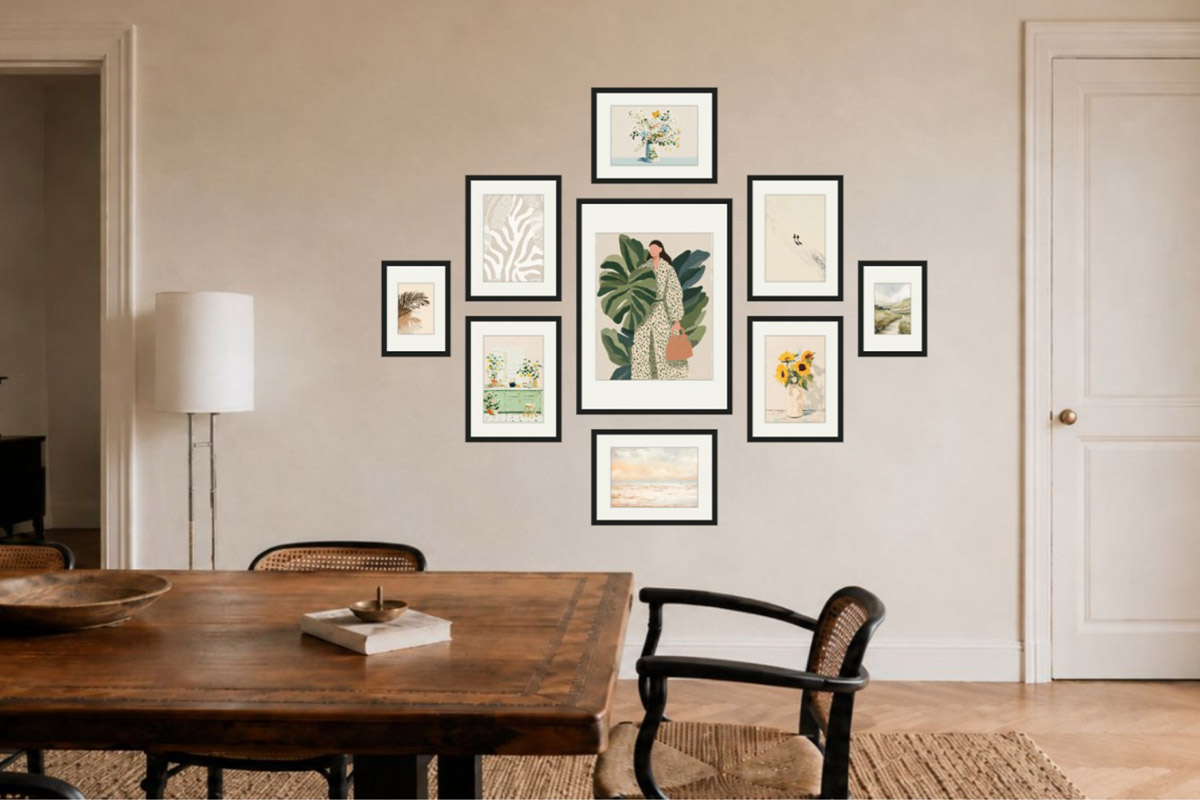
A whole empty wall / feature wall. With no furniture pulling on it, the anchor sits right at the centre of the wall and the frames radiate out — the purest statement. The end of a hallway, a stairwell turn, or above a bed with no headboard work the same way: put the anchor on the wall’s main sightline and let the rest turn around it.
Step 1: Choose the anchor — it’s the star
The anchor is the star of the whole wall, so set it first; everything else is chosen to go with it. Three things to sort out:
Size — about twice the surrounding frames. To hold its own, the anchor has to be clearly bigger than everything around it. In practice, use an IKEA 50 × 70 cm (20 × 28 in) or 61 × 91 cm (24 × 36 in) anchor, with 30 × 40 cm (12 × 16 in) and 21 × 30 cm (A4, mounted without the mount) around it. One size step up from the small frames isn’t enough — two steps is what gives it real star quality.
What goes in it — it sets the mood of the whole wall. Because it’s the star, the anchor should hold the one thing you most want people to see: a picture with attitude, a main family photo, a big block of colour. The small frames answer it — the same palette, the same theme, or the supporting shots from the same set. Don’t treat the anchor as “just a blown-up version of any picture” — it carries the content, the rest supports.
Height — measure from the anchor’s centre. A focal wall’s height isn’t set by the group’s centre but by the anchor’s visual centre: put it at eye level, 57 inches (150 cm) by default, nudged to the average height of the people who live there. The small frames sit around the anchor and don’t each have to reach for that line.
Step 2: Line up the centre-line — the most important step
This is the step a focal wall most often trips on and the one that decides it: give the wall a vertical centre-line and sit the anchor on it.
When there’s furniture below, that line is the midpoint of the furniture (the middle of the sofa back, the centre-line of the headboard, the centre of the mantel), not the geometric centre of the wall. The reason is simple — the eye automatically links the anchor and the furniture below into one vertical line, and if that line isn’t aligned, the whole group looks “pulled to one side,” even if every frame is perfectly straight. So before you place anything, find the furniture’s midpoint, sit the anchor’s vertical centre-line on it, then lay the small frames out symmetrically to each side.
On an empty wall, with no furniture to reference, put the anchor at the horizontal centre of the wall (or the wall’s main sightline) and let the group open out symmetrically around it.
A common trap is to “line up on the centre of the wall” whether there’s furniture or not. If the furniture itself isn’t centred on the wall (a sofa pushed to one side, a console near the door), lining up on the wall’s centre actually leaves the gallery wall out of step with the furniture. When there’s furniture, a focal wall hangs to the furniture; only on an empty wall does it hang to the wall.
Not sure where the anchor goes or whether the group will pull to one side? Set the furniture and the gallery wall together in HangPlanner and you can see at a glance whether the centre-line lines up.
Step 3: Arrange the frames — symmetrical, evenly spaced, room to breathe
Once the anchor is set and the centre-line is aligned, all that’s left is arranging the frames around it. The trick is symmetry, even spacing, and don’t pack it tight:
- ✅ Radiate symmetrically: the small frames appear in pairs to the anchor’s sides (seven frames) or all around it (nine frames), with roughly balanced weight left-to-right and top-to-bottom, so the eye stays steady.
- ✅ Even spacing: leave an even 5–8 cm (2–3 in) gap between frames to keep the group clean. Gaps that jump around are the biggest tell of a wall that “wasn’t set out.”
- ✅ Room to breathe: the small frames don’t need to pack the anchor in tight — a little space around it lets the anchor breathe and carry the wall as the star.
- ❌ Don’t let the small frames upstage it: too big, too many, too tight and the anchor stops being the focal point, and the wall drops back to a patch of “roughly equal frames” — and the focal look is gone.
Use a ready-made layout: a seven-frame band or a nine-frame ring
Don’t want to place every frame from scratch? HangPlanner has ready-made focal layouts — pick one and hit Insert, and the anchor, the small frames, the sizes and the gaps are all set. Two are the mainstays:
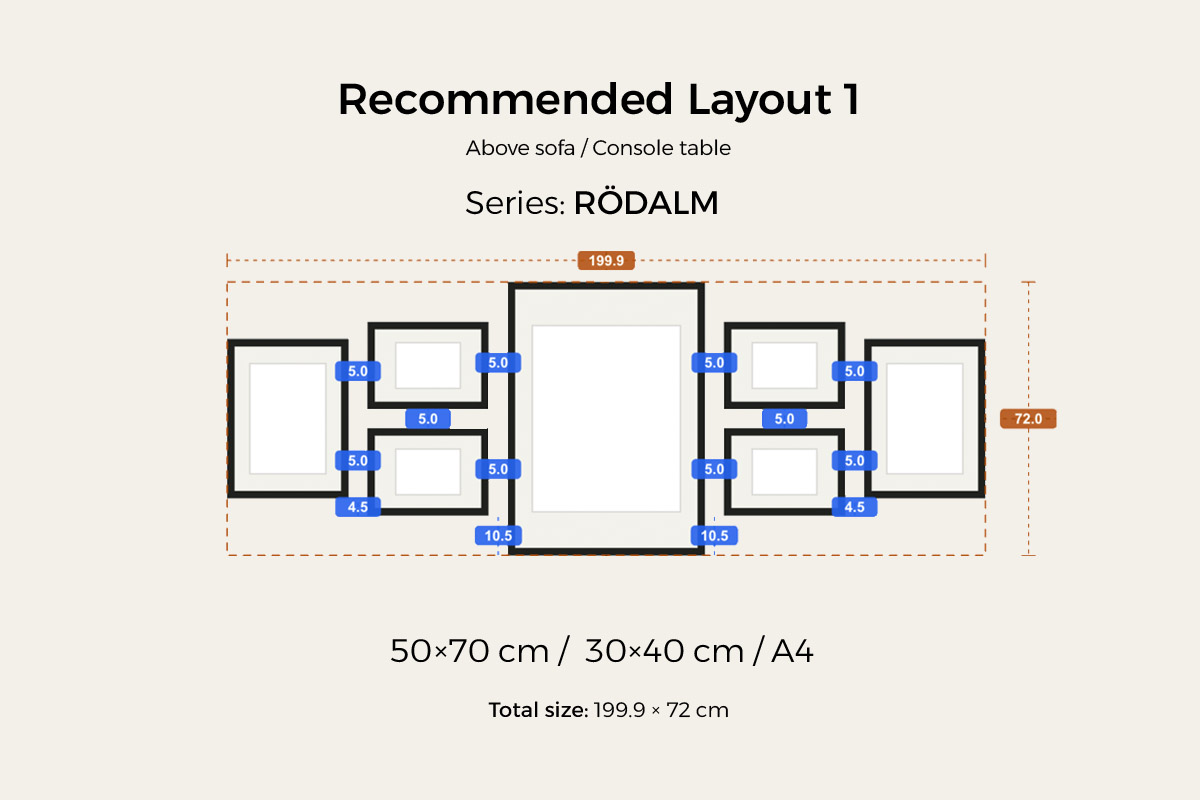
Seven-frame band. One big frame in the centre plus three small frames each side in a band — the group runs horizontal, best for a sofa or long console and other wide walls. A 50 × 70 cm (20 × 28 in) anchor, with 30 × 40 cm (12 × 16 in) and 21 × 30 cm (A4) to the sides.
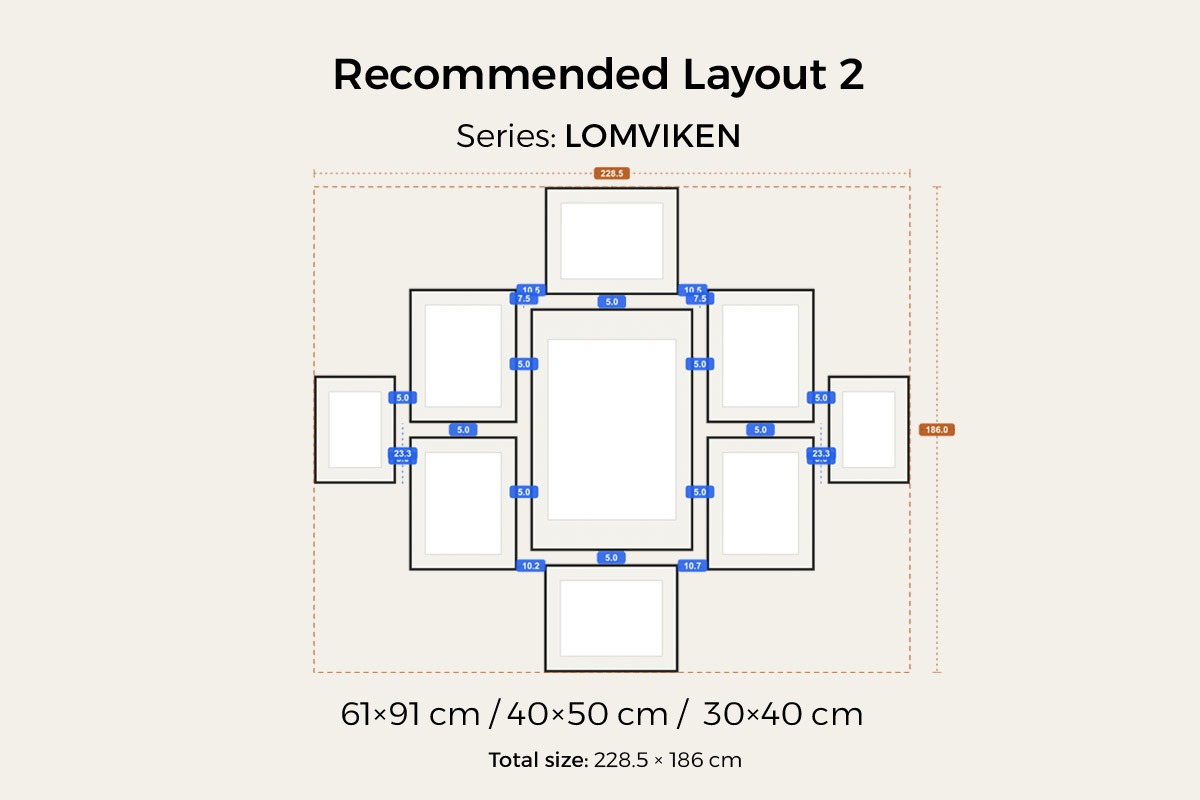
Nine-frame ring. One big frame in the centre with a ring of small frames above, below and to the sides — squarer and bigger, suited to a squarer statement wall or a whole empty wall. The anchor can step up to 61 × 91 cm (24 × 36 in), with 30 × 40 cm frames around it.
Once you’ve picked one, change it freely: one series in one colour is easiest, but you can mix across series, colours and materials — preview it on the wall before you buy. A handy ratio — keep the group’s width at about 2/3 to 3/4 of the furniture below.
A few ways a focal gallery wall goes wrong
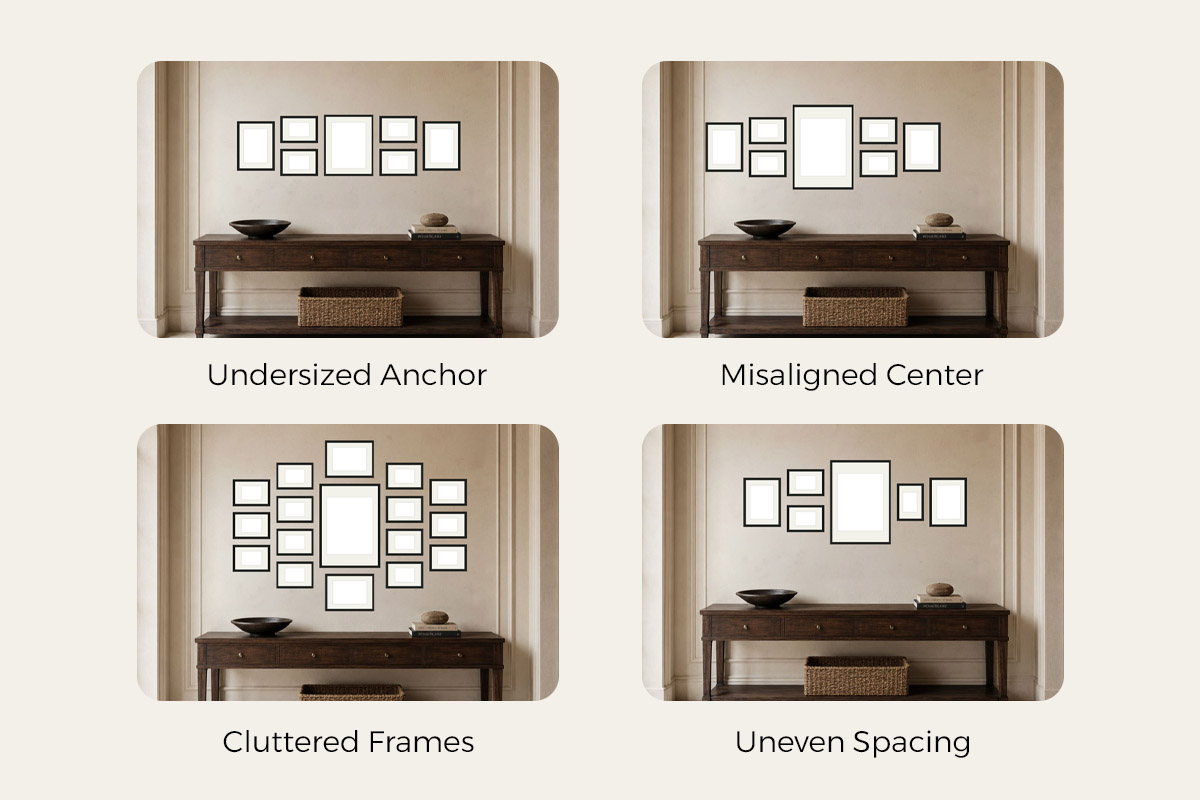
The anchor isn’t big enough to hold its own. The most common mistake: the anchor is only a touch bigger than the small frames, so the wall reads as “a patch of roughly equal frames” and the focal point disappears. Fix — make the anchor about twice the small frames, two size steps up, so the hierarchy reads.
The wall isn’t lined up with the furniture. Once the centre-line isn’t sitting on the midpoint of the sofa/bed/fireplace, the whole group pulls to one side, even with every frame hung straight. Fix — find the furniture’s midpoint first, sit the anchor’s vertical centre-line on it, then lay out symmetrically to each side; don’t default to “the centre of the wall.”
Too many small frames, packed too tight, upstaging the anchor. Trying to hang every photo you own ends with the small frames boxing the anchor in and drowning the star. Fix — give the small frames room to breathe, 5–8 cm gaps, and hang two fewer rather than let the edges out-shout the middle.
Uneven radiating and gaps that jump around. Unbalanced numbers or weights on the two sides, and inconsistent frame gaps, make the whole group look careless. Fix — the small frames come in pairs with balanced weight left and right, with an even gap between frames; measure once before you hang.
Try it on your real wall in HangPlanner first
A focal wall has a clear hierarchy, but three things are hard to picture in your head — how big the anchor has to be to hold its own, whether the centre-line lines up with the furniture, and whether the small frames’ gaps are even. Dragging a version is the fastest way through. You don’t have to calculate the sizes, the gaps or the hook heights — HangPlanner uses the real Frame width to give you the group’s overall size, every gap, and the position of each nail.
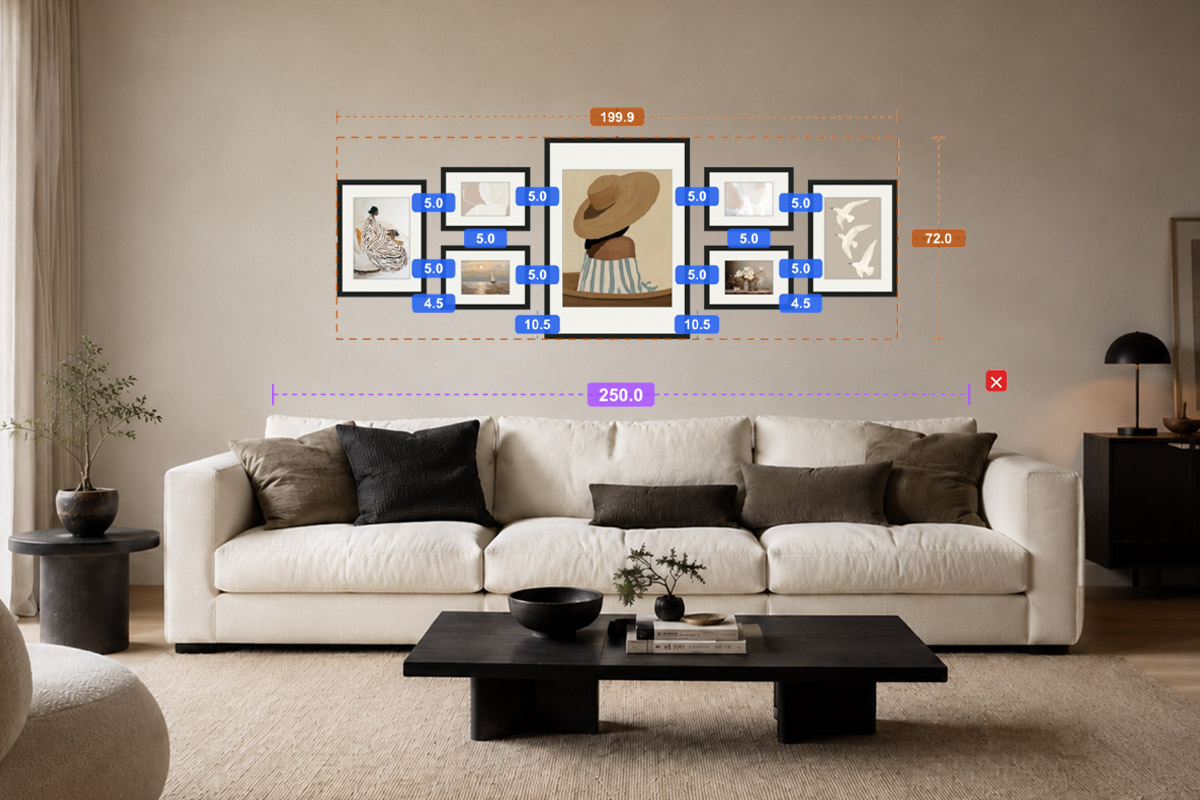
In HangPlanner, set your wall size, or upload a photo of the real wall and calibrate the scale against something of known size — a sofa, bed or mantel — then:
- Place the furniture below first — a sofa, bed, mantel or console table
- Drag the anchor (the big frame) over the middle of the furniture, its vertical centre-line on the furniture’s midpoint
- Drop in a ready-made focal set (seven or nine frames), or add the small frames yourself, symmetrically to the anchor’s sides or all around it
- Adjust the anchor’s height so its visual centre is at eye level (57 inches / 150 cm by default)
- Switch to Dimensions for the group’s width and height, every gap, and the distance to the wall edges — all worked out
- Mark each frame’s hook position on the wall and nail to it in one go
- Open Wall Budget to compare seven vs nine frames, and different series
You can see on screen which version sits best — a lot cheaper than drilling the wrong holes and then filling and repainting.
FAQ
What is a focal gallery wall?
Where does a focal gallery wall work best?
How big should the centre anchor be?
How high should a focal gallery wall hang?
How do you line up a focal gallery wall's centre-line?
How many frames should a focal gallery wall have — seven or nine?
Can a focal gallery wall mix different series and colours?
Is the "50 × 70 cm" in an IKEA product name the outer frame size?
Sizing facts follow IKEA’s official Measurements fields — Frame width / height, Frame depth, Mount opening, Picture with mount, Picture without mount — where the name-size is the Picture without mount, not the outer frame. Frame series shown are current IKEA lines; confirm size, colour and availability on your local IKEA product page before buying. All sizes are given in cm and inches.
Last reviewed: 2026-07-14