
Hallway Gallery Wall with IKEA Frames

The hallway is probably the most underrated wall in the house. Most people walk past it, hang a mirror, and call it done — writing it off as “too narrow to work with.” The truth is the opposite: a hallway is the one wall in your home with no furniture anchor, which makes it the freest wall you have. A living-room gallery wall has to defer to the sofa; the wall above a fireplace has to defer to the mantel. A hallway has none of that — no big piece of furniture underneath pinning down your composition, so you can arrange it however you like.
The one-line answer: a hallway is a long, linear space, so the layouts that fit it best are the ones that run along its length — a single row of equal frames (an “n-panel” row) or a grid. Those two are the optimal picks for a hallway. Free-form, bottom-aligned, and symmetrical all work too — choose by your collection and the wall. The only three rules to keep: in a narrow hallway pick slim, shallow-profile frames so they don’t catch as you pass; center the whole arrangement at your household’s standing eye level (57 inches / 150 cm is the average starting point, nudge it for your family’s height); and use the whole length of the wall instead of bunching everything into one spot. How many frames and what sizes follow from the layout you pick — the end of this guide walks you through it in HangPlanner.
Here’s the thing many “narrow hallway decor” guides get backwards: the hard part of a hallway is never “how do I make do with a cramped space” — it’s “it’s so open, where do I even start.” There’s no sofa or fireplace to set the anchor for you, so stop hunting for “which piece of furniture do I anchor to.” In a hallway, the wall itself is the anchor. Using that freedom well matters more than forcing on the living-room “anchor-to-furniture” logic.
This guide covers three things: how you can actually lay out a hallway (a layout menu plus how to choose), what frames to buy for a narrow hallway, and how to hang them so they’re level, even, and out of the way.
The lazy default
Layout → A hallway is a linear space, so the optimal picks are the ones that run along it: a single-row n-panel or a grid (especially good in a narrow hallway). Want something looser? Free-form / salon, bottom-aligned, and symmetrical all work too. You don’t have to count frames yourself — pick a layout and use its ready-made preset in HangPlanner.
Hanging height → A hallway is seen while you walk it, or taken in whole from the far end, so set the height to the standing eye level of the people who use it: center the group at their eye height. 57 inches (150 cm) is the museum average — use it as a starting point, then raise it a little for a taller household or drop it if you want kids to see comfortably. This is the opposite of above a sofa or fireplace: those anchor to furniture, a hallway has none, so it anchors to the person walking through.
Frames → A hallway is narrow and you brush past the wall, so slim-edged, shallow-profile frames are easiest to live with. In the IKEA range, LOMVIKEN (aluminium, thin edge) sticks out the least and RÖDALM (many sizes and colours) is the most versatile; avoid SANNAHED (a shadow box with a 6 cm / about 2.4 in Frame depth — too deep, it juts into the walkway).
Fixing → Hallways are often rented, or you just don’t want to make a mess of holes. Frames under 1 kg go up on a flat wall with adhesive foam strips (Command strips / IKEA ALFTA); heavier frames get nails and the right anchors.
How to lay out a hallway: use the freedom
Start with this rule of thumb: a hallway follows the wall and your collection, not the furniture. Above a sofa you anchor to the sofa; above a fireplace you anchor to the mantel; a hallway is an empty wall — no big furniture to set its width or anchor, which is exactly what hands you the most freedom. Someone else’s hallway photo may not translate to yours, because your wall’s length and the pieces you own are what you should be following.
That’s the single most important thing to get straight about a hallway gallery wall: it isn’t “which layout is most correct,” it’s “which layout best fits your wall.” Every layout in the menu below works in a hallway; but because a hallway is a long, linear space, a grid and a single-row n-panel run along it best and are the optimal picks, so they sit at the top:
| Layout | Best for which hallway | What it’s like |
|---|---|---|
| Grid · ✅ hallway optimal | You want order, same-size frames | Equal frames, evenly spaced in a 2×n block — the tidiest, reads best along the run |
| Single-row n-panel · ✅ hallway optimal | Narrow hallway, want it clean | One row of n equal frames spread horizontally, extending along the walk |
| Bottom-aligned | Tidy but not stiff | Frame bottoms line up; tops vary freely |
| Symmetrical | An entryway feature wall, formal | Mirrored left and right |
| Free-form / salon | Casual, mixed-size collection | Mixed sizes, organic spread — the most free |
Best fits
Narrow hallway → a grid or single-row n-panel + slim frames (optimal). In a narrow hallway you brush the wall as you pass, so a horizontal row (single-row n-panel) or a compact grid running along the walk is the easiest to move past and the best-looking — paired with slim, shallow-profile frames.
Long hallway → a single-row n-panel or grid, extended along the wall. A long hallway suits pulling a row of n frames along the walk, or laying a stretch of grid — it fits the linear shape best. Want more character? Then consider a free-form mix or bottom-aligned.
Entryway → a compact symmetrical group, or a small grid. An entryway is often the first wall you see coming in, so a centered, roughly symmetrical group reads most formal; a small block of grid is clean too; for something livelier, a small free-form cluster.
Watch out for
- Frames too deep, jutting into the walkway → In a narrow hallway you pass close to the wall, so a deep frame (like SANNAHED, Frame depth 6 cm / about 2.4 in) catches clothing and shoulders and feels oppressive. Favour slim, shallow-profile frames (see the next section).
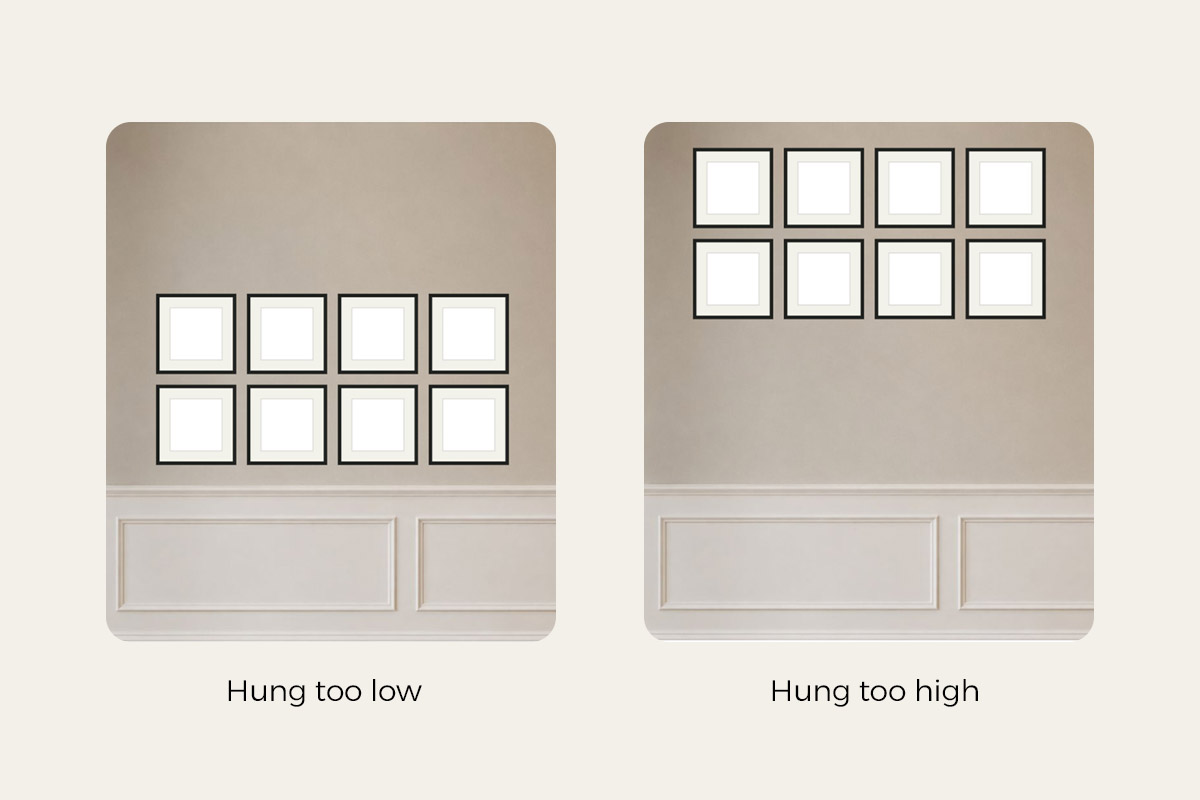
- Hung too high or too low → A hallway is seen standing and walking, so don’t hang by feel. Set the group’s visual center to your household’s standing eye level (57 inches / 150 cm is only the average starting point). See “How to hang.”
- Covering switches, door frames, sconces → Hallway walls often have light switches, door frames, and wall sconces. Mark them first and leave clearance — don’t let a frame straddle a switch.
- Forcing the “anchor-to-furniture” logic → A hallway has no sofa or fireplace, so stop agonising over “which piece do I anchor to.” The wall itself is the anchor; just use the freedom.
Three ready-made presets (grid first — a starting point)
Don’t want to arrange from scratch? These three ready-made HangPlanner presets can be copied straight in — the grid leads because it’s the hallway optimal; all three are only starting points, with counts, sizes, and series already set, and you can freely tweak from there.
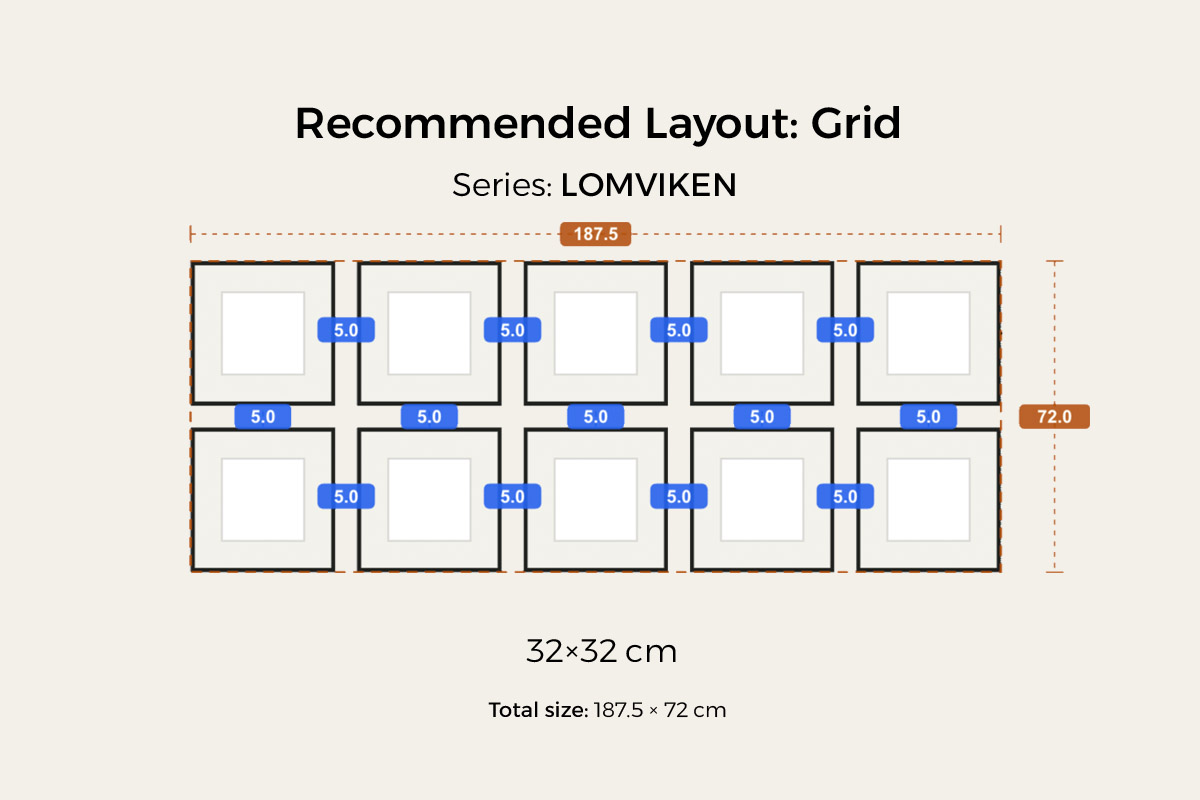
Grid · LOMVIKEN — hallway optimal: ten 32×32 cm (about 13×13 in) equal square frames in a 2×5 block, even 5 cm gaps, group size about 187.5 × 72 cm (about 74 × 28 in). It runs along the walk, tidy and easy on the eye, and is especially good in a narrow hallway — LOMVIKEN is a thin aluminium edge that sticks out the least. Flatten it to a single line and you’ve got a single-row n-panel (the other hallway optimal).
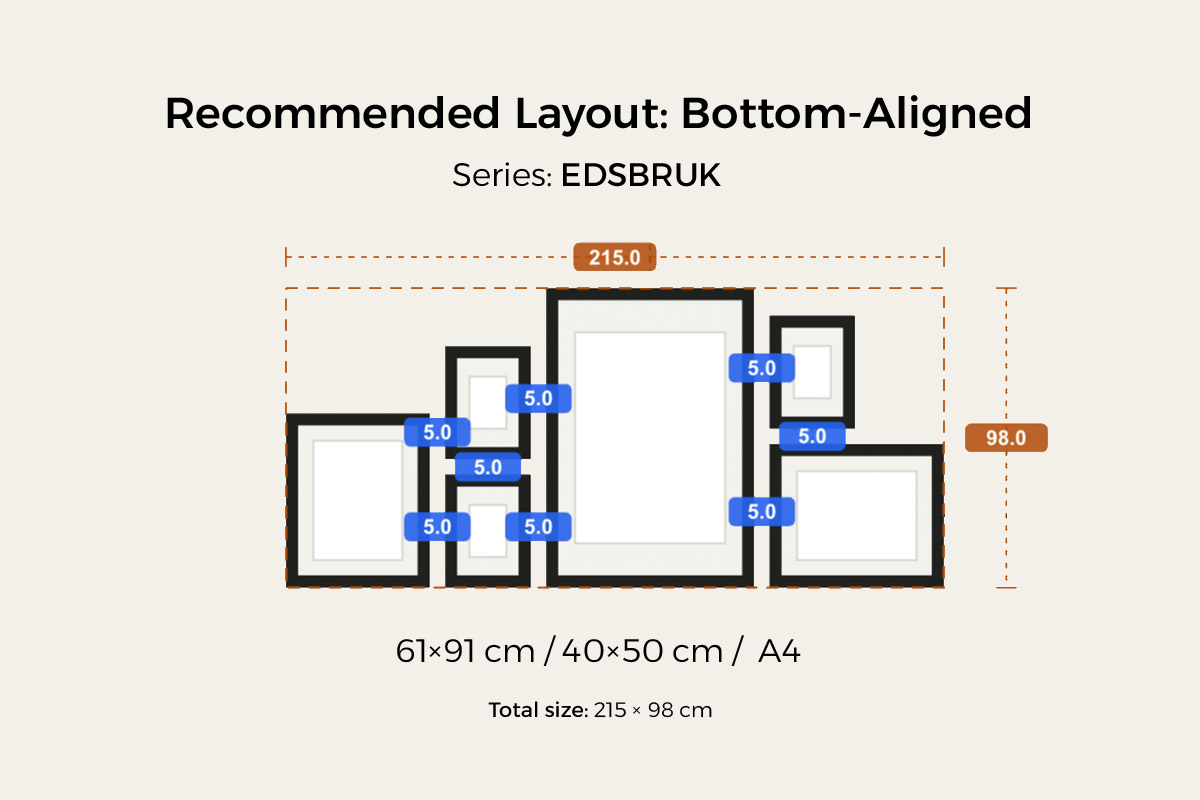
Bottom-aligned · EDSBRUK: mixed-size frames with their bottoms on one line and tops varying freely, using 61×91 cm (about 24×36 in), 40×50 cm (about 16×20 in), and A4, group size about 215 × 98 cm (about 85 × 39 in). Pick it when you want tidy but not stiff. See bottom-aligned gallery wall.
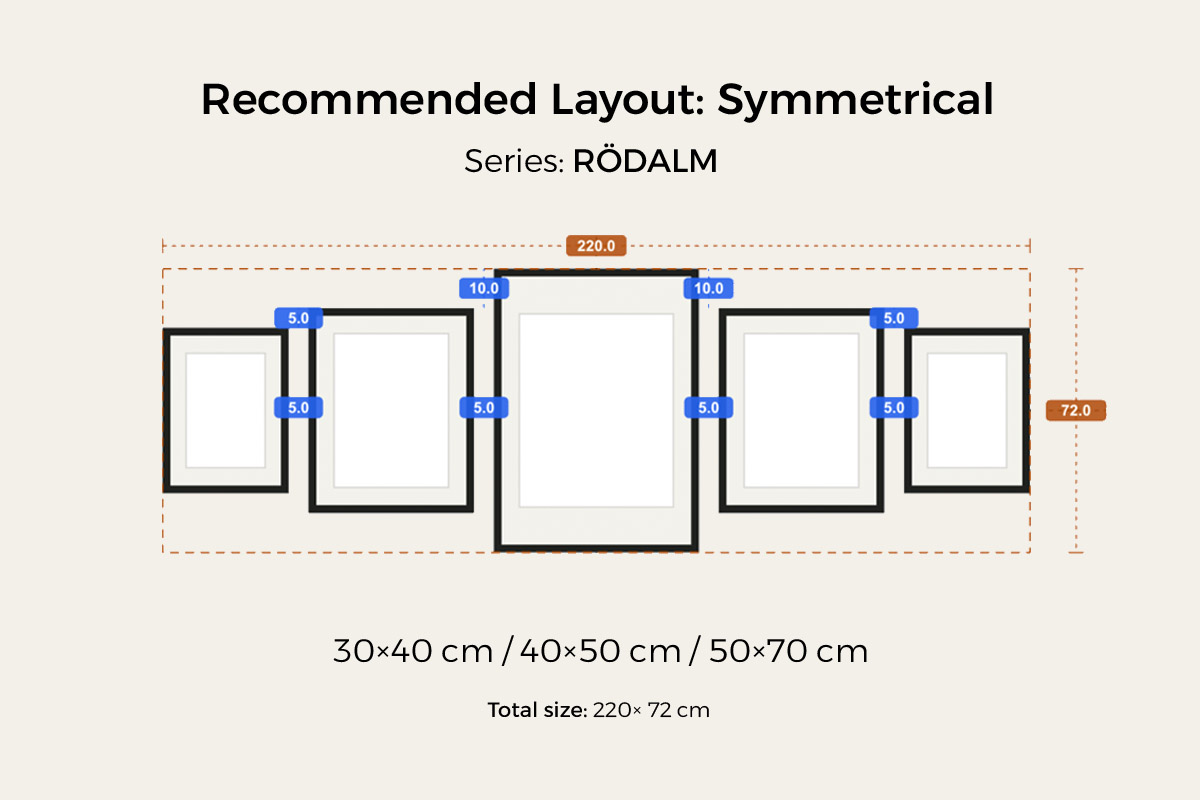
Symmetrical · RÖDALM: a large center with mirrored, tapering sides, using 30×40 cm (about 12×16 in), 40×50 cm, and 50×70 cm (about 20×28 in), group size about 220 × 72 cm (about 87 × 28 in). Pick it for a formal, statement entryway wall. See symmetrical gallery wall.
Want something looser? The free-form / salon option from the menu above works perfectly well too — a hallway is free enough for it; the neat grid / n-panel are just its optimal defaults.
What to buy: slim, shallow-profile frames for a narrow hallway
One-line buying rule: first pick a layout by your wall’s length and your collection (a hallway is free, so it’s your call), and in a narrow hallway favour slim-edged, shallow-profile frames; the counts and sizes come from your chosen layout’s ready-made preset in HangPlanner — not from buying a pile of frames and then seeing whether the hallway can take them.
Why a hallway cares more than most about “slim”: a hallway is a passage, and you walk close to the wall. The more a frame stands off the wall (the larger its Frame depth in IKEA’s official Measurements), the more it catches and the more crowding it feels. So a deep frame that’s fine in a living room is worth a second thought in a narrow hallway.
How to choose a frame series:
| You want | Pick this IKEA series | Notes |
|---|---|---|
| Slim edge, shallow profile (top pick for a narrow hallway) | LOMVIKEN (aluminium) | IKEA’s only metal frame — a thin edge, looks like it floats, sticks out the least |
| Most versatile, many sizes and colours (for a free-form mix) | RÖDALM | Frame depth 3 cm (about 1.2 in), 6 colours (black / white / oak / birch / walnut / red), mixes sizes most naturally |
| Minimal lines, budget-friendly | KNOPPÄNG / FISKBO | Both fibreboard (engineered wood), clean and cheap |
| Avoid (narrow hallway) | SANNAHED | A shadow box, Frame depth 6 cm (about 2.4 in) — too deep, juts into the walkway |
Two facts a hallway makes especially useful:
IKEA frames use a plastic front panel, not glass — a drawback in a living room, maybe, but an advantage in a high-traffic, easily-bumped hallway: light, won’t shatter, no glass on the floor if it’s knocked, safer with kids (the trade-off is the plastic scratches, so wipe it down now and then).
Only two series are real wood: HÄCKHAGTORN (pine) and EDSBRUK (stained wood). RÖDALM, KNOPPÄNG, FISKBO and the like sound like wood but are fibreboard with a paper-foil finish (engineered wood) — not a flaw, just don’t buy them as solid wood.
How to hang: level, even, out of the way
Layout and frames settled, three practical things left to get right.
Keep the gaps from spreading. Leave 2–3 inches (5–7 cm) between frames, measured frame-edge to frame-edge. Too tight (under 1.5 in) reads dense; too wide (over 4 in) reads sparse and uncertain. 2 inches is the safe default for most hallways. In a single-row layout especially, keep the gaps even so it reads as one clean line along the walk. (See gallery wall spacing.)
Hanging height: no furniture, so hang to the people who use it. This is the biggest difference between a hallway and above a sofa or fireplace — those drop the 57-inch rule and anchor to the furniture; a hallway is an empty wall with nothing underneath, so the anchor isn’t a fixed number, it’s your household’s standing eye level: put the arrangement’s visual center (the center of the whole group’s bounding box, not each frame on its own) at that height. 57 inches (150 cm) is the average eye level museums and galleries use — take it as a starting point and adjust: raise the whole group a few centimetres for a taller household, lower it if you want kids to see comfortably. A hallway is seen standing and walking, and eye level is what looks right.
Don’t cover doors, switches, sconces. Hallway walls often carry light switches, door frames, and wall sconces. Before you start, measure and mark them on the wall so the arrangement steers clear or leaves room — don’t let a frame end up awkwardly straddling a switch.
Renting / no-drill options. Many hallways are in rented homes, or you just don’t want a wall of holes in a passage. Frames under 1 kg (IKEA’s fibreboard / aluminium frames are mostly in that range) go up securely on a flat, clean wall with adhesive foam strips (Command strips / IKEA ALFTA); heavier frames, or brick / stone walls, need nails and the matching anchors. (For a full rundown of no-drill hanging, we have a dedicated “hang heavy art without studs” guide — it’ll be linked here once live.)
Try it in HangPlanner before you drill
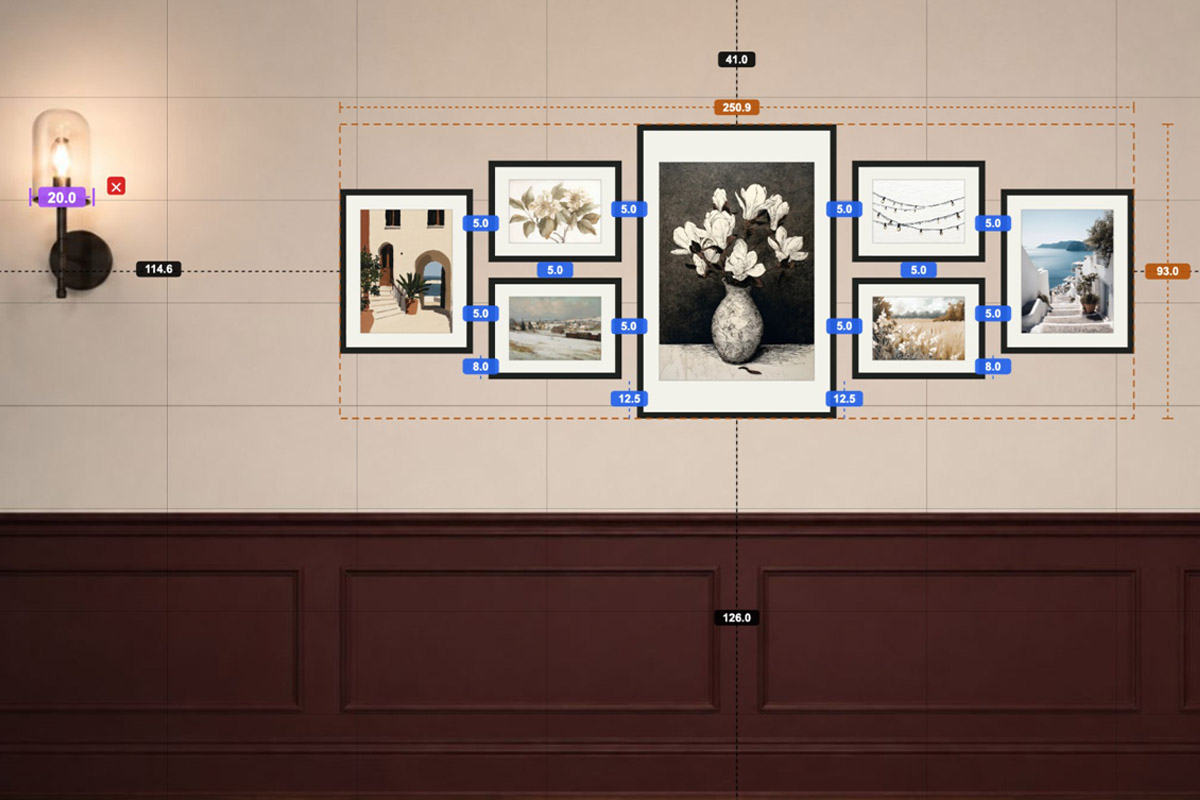
A hallway’s high freedom is a good thing, but it has a side effect: too many choices, so it’s hard to tell which version is best — and a narrow space is unforgiving, so fixing a wrong hole is more of a hassle. Rather than shuffling paper tape on the passage wall (twenty minutes a round, and never quite accurate), lay out a version on screen first.
In HangPlanner:
- Set the real length and height of the hallway wall, or upload a photo of the hallway and use a known width (like the door) to calibrate the scale
- Mark the positions of doors, switches, and sconces so the arrangement can steer clear
- Drop in a layout — drag a free-form yourself, or use a ready-made preset for single-row, bottom-aligned, grid, or symmetrical
- Spread it along the wall and set the group’s visual center to your household’s standing eye level (start at 57 inches / 150 cm, adjust for height)
- Switch to Dimensions to see the group’s width and height, every gap, and the height off the floor — check it against 2–3 inches of spacing and your chosen eye-level center
- Compare a few layouts and sizes to see which best fits your long wall
- Open Wall Budget to compare the cost of different combinations
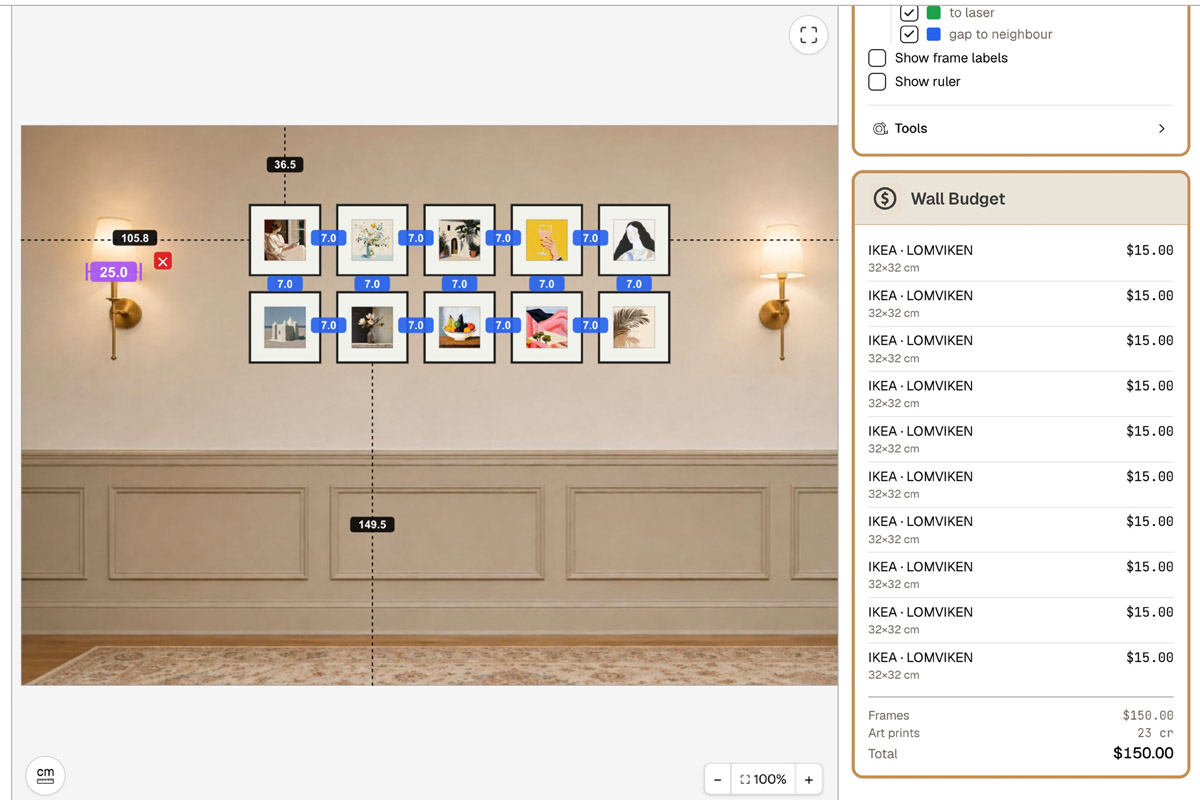
On screen you can see which version flows and which feels cramped — far cheaper than drilling the wrong hole in a passage wall.